
DIY cardboard coral structures
- gage egan

- Jul 27, 2020
- 4 min read

If modal making is more to your taste and skill set then this simple cardboard approach could be useful for helping you to demonstrate and express your design or ideas of what you consider to be a suitable template for a coral skeleton scaffold.
The method I’m demonstrating through a series of images and instructions is very basic, yet as to what can be achieved with this approach truly depends on how you want to use it, once you have an understanding as to how it works, you can being to creat new shapes, forms and even build upon your cardboard coral structure with other materials to develop more complex structure, textures, or to even add functions.
What you will need:
1) pencils
2) eraser
3) ruler
4) cutting mat
5) scalpel or scissors
6) cardboard or thick card

To creat my coral cardboard template I used a spare piece left over from a shipping box which was roughly 25cm x 20cm in size and 1mm thick, what size of cardboard you chose to use isn’t that important yet it can limit the scale and complexity of your outcome, what you do need to take note of is the thickness of your material as this will become important for joining the two piece later on.

Once you have your piece of cardboard begin by dividing it into two even sections so that you know how much room you have to work with when drawing out your coral structure template, it’s also worth marking out the center point of each of your half’s at this point with a line as this will help you later to creat the slots that gives the cardboard structure it’s 3D form. With this all marked out use you’r scalpel to cut the card into the two equal parts and place one aside for the next step.

After dividing your cardboard into two pieces you can now make a start on drafting out your Coral scaffold design, it’s important at this stage to not draw over your centreline and to use it as a maker for your design to work around, leaving roughly 0.5 to 1cm either side of your line depending on the thickness of the card you are working with, other points to consider well drawing out your template is to keep your deign linear on both pieces of your card as when they are joined Later you can’t have any overlapping sections that could block the mid-section.

With your designs drafted out onto the two pieces of card and you have defined your lines just to the parts you want to work with you can begin to slowly cut out your design with a scalpel or craft knife (If under the age of 16 seek an adults help), scissors are an option but can cause you design to become flimsy on sections where there is a curve or tight angle.
Taking your time to slowly cut around your design can really improve the quality of your outcome, this will also minimise the risk of an accidents, by also making sure that when you are use the scalpel to make sure the direction it is going in is clear of fingers or other objects in case of slips.

Now that both half’s of your design have been cut out and your happy with the coral forms you have, you can work with the central line you created at the begging, first measure out the thickness of your card in my case that was 0.2cm and divid that by two so that each side of your central line creates the hole Measurement for mine that was 0.1cm on either side of the line this should not be the hole width of your base otherwise the slots wont work, next with the central line mark the half way point of the length of your modal as mine was 12cm long the mid-point was 6cm, with these measurements marked out you can now creat the rectangular slots for your pieces, for this to work the two rectangular slots need to be on opposite ends of each coral cardboard cutout these can then cut out, it’s best to do this part with a metal edge ruler as the clear the cut will help to keep a tight fit. (view next image if visual aid is needed)

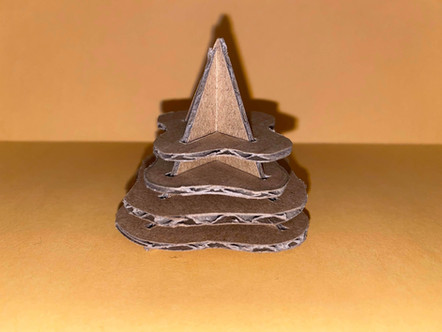
As seen within the image you should have two coral cardboard designs of your own making that can now be joined together, if the rectangular slots of been cut correctly then they should juts fit tightly togethe, if not then this can be corrected by lining each slot with some glue or using tape once they are joined it strengthen the form.

If all the steps have been followed correctly then you should have a form similar to this but of your own design as this is just a demonstration of what can be done with this simple form building method, from this you can build upon your form to add texture, more structure or attaching other materials to give your cardboard coral a function.


on the top of the post I’ve included a printable template for anyone who wants to try recreating the demo modal I’ve made but the images above are a examples of what else can be made by using this simple method.


Comments